How to Make a Fillable Form in Excel
By
![]() Emily Shaw
| on
Emily Shaw
| on
You can make a fillable form in Excel by enabling the developer tab, designing a clear layout, adding interactive controls (like drop-downs and checkboxes), and protecting the sheet so only input fields can be edited. Test the form for accuracy, follow best practices for simplicity and usability, and convert it to PDF if you need an easy-to-share, consistent version.
Creating fillable forms in Excel is a practical way to streamline data collection and management. Excel provides the flexibility to design custom forms that are easy for users to complete when gathering survey responses, tracking employee information, managing project details, or more. By making your form interactive, you can improve accuracy and save time on data entry, while presenting information in a more organized way.
This guide will walk you through what Excel forms are, how to create one step-by-step, and how to design user-friendly layouts. You’ll also learn how to convert your form into a shareable format for broader accessibility.
Table of Contents
What Are Excel Forms and How Can They Benefit Your Data Collection
Excel forms are structured worksheets with interactive fields like drop-downs and checkboxes, designed for clarity. They improve accuracy through validation, save time with automation, enhance user experience, and streamline data management for businesses, teams, and educators.
An Excel form is a worksheet designed with interactive fields, drop-down menus, and checkboxes that make it easy for users to input information. Unlike plain spreadsheets, these forms focus on a clean, structured interface so that the user sees only what they need to fill out.
The main benefits of Excel forms for data collection include:
-
Improved data accuracy – Built-in validation rules help ensure only correct and consistent data is entered.
-
Time savings – Automated formatting and controls reduce manual corrections later.
-
Better user experience – Users interact with a clear, guided layout rather than a busy spreadsheet.
-
Streamlined data management – Collected data feeds directly into your workbook for analysis and reporting.
For businesses, project teams, and educators, fillable Excel forms can be customized to fit nearly any type of data-gathering process.
Step-by-Step Guide to Creating a Fillable Form in Excel
To create a fillable form in Excel, enable the developer tab, design a clear layout, add form controls (text boxes, drop-downs, checkboxes), protect non-input cells, and test everything before sharing.
Step 1: Enabling the Developer Tab
The Developer tab is essential for creating a fillable form because it provides access to form controls like checkboxes, drop-downs, and buttons.
1. Open Excel and click File > Options.
2. In the Excel Options dialog box, select Customize Ribbon.
3. On the right-hand side, check the box for Developer.
4. Click OK to add the Developer tab to your ribbon.
Once enabled, you’ll see the Developer tab alongside other standard tabs like Home and Insert.
Step 2: Customizing Your Form’s Layout and Design
Before adding any controls, decide on your form’s structure. Ask yourself:
· What data needs to be collected?
· How should the form be organized for clarity?
· Will the form be printed or used digitally?
Tips for designing your layout:
· Use clear labels for each field.
· Group related fields together (e.g., personal info, contact details).
· Leave enough white space to make the form easy to read.
· Consider using bold headings and shading to separate sections.
Setting up your grid before adding controls ensures a cleaner final result.
Step 3: Inserting Form Controls
Form controls make your Excel sheet interactive. Common controls include:
· Text boxes for free-form input.
· Combo boxes (drop-down lists) for selecting from a list of predefined items.
· Checkboxes for yes/no responses.
· Option buttons for selecting one choice among several.
To insert a control:
1. Go to the Developer tab.
2. Click Insert in the Controls group.
3. Select your desired control type from either Form Controls or ActiveX Controls.
4. Click and drag on your worksheet to position the control.
For drop-down lists, you can link the control to a range of values in your workbook. For checkboxes and buttons, you can assign macros or link them to specific cells for automated behavior.
Step 4: Securing and Protecting Your Form
A fillable form should allow users to enter data without accidentally altering the design or formulas. Protecting your form ensures its structure stays intact.
Steps to secure your form:
1. Select the cells where users will enter data and set them to Unlocked (Format Cells > Protection).
2. Lock all other cells that contain formulas, labels, or controls.
3. Go to Review > Protect Sheet and set a password if desired.
This way, users can interact only with designated fields while the rest of the worksheet remains protected.
Step 5: Finalizing and Testing Your Fillable Form
Before distributing your form, test it thoroughly:
· Check that all controls work as intended.
· Verify that data is recorded correctly in linked cells.
· Ensure drop-down menus display the correct options.
· Try inputting various types of data to confirm validation rules are working.
If possible, have a colleague test the form as well. Feedback from someone who wasn’t involved in the design can help identify usability issues.
Best Practices for Designing User-Friendly Excel Forms
Keep forms simple with consistent formatting, compact design, instructions, highlighted required fields, and minimal clutter. A clear layout improves user experience and data quality.
A fillable form should be simple, intuitive, and free from unnecessary complexity. Follow these best practices:
· Use consistent formatting for fonts, colors, and field sizes.
· Limit scrolling by keeping the form compact.
· Provide instructions near each section or in a dedicated help cell.
· Highlight required fields using a distinct color or symbol.
· Avoid clutter—every extra element should serve a purpose.
Remember, your form’s usability directly impacts the quality and speed of data collection.
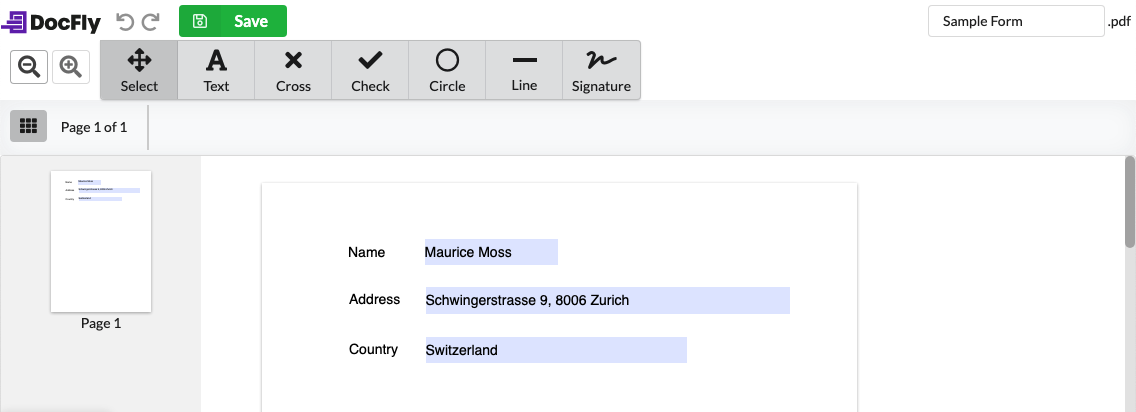
Convert Your Excel Form to a PDF for Easy Sharing
To share securely, save the form as a PDF via File > Save As. This preserves layout and accessibility, with the option to create either static or fillable PDFs using tools like Adobe Acrobat.
Once your form is ready, you may want to share it with people who don’t have Excel or to prevent further editing. The simplest way is to convert Excel to PDF.
Doing this preserves your form’s layout and ensures that all recipients see the same version. Depending on your needs, you can choose between different types of PDF files—for example, a static PDF that cannot be altered, or a fillable PDF that still allows users to input data digitally.
To convert your form:
1. Go to File > Save As.
2. Select PDF from the Save as type dropdown menu.
3. Choose your destination folder and click Save.
If you want to keep the form fillable in PDF format, you may need to use a PDF editor to add interactive fields after exporting.
Conclusion
Making a fillable form in Excel is a valuable skill for anyone who needs to gather and organize data efficiently. By enabling the Developer tab, designing a clear layout, adding form controls, and protecting your worksheet, you can create professional-grade forms that improve accuracy and user experience.
Following best practices ensures your form is intuitive and effective, while converting it to a PDF expands its accessibility. Whether you keep it in Excel or share it as a PDF, a well-designed fillable form will make your data collection process smoother and more reliable.

Emily Shaw is the founder of DocFly. As a software developer, she built the service from scratch and is responsible for its operations and continued growth. Previously, she studied engineering at the University of Hong Kong and mathematics at the University of Manchester.
Loved what you just read? Share it!